This is something I wanted to do a long time and thanks to Niall Bradys excellent guide at Windows-Noob.com it was easy. Except for the parts that were hard. :-) There seems to be a few problems with USMT4 at the moment. Especially with 64-bit Windows 7. I’ll tell you in a sec. what I ran into…
I also wanted to make Niall’s Task Sequence a little shorter with VBScript, I like my Task Sequences short and snappy. Or at least, as short as they can be. Peter van der Woude also has a post on this, but hey, I’m using VBScript! :-)
Let’s get on with it. What are we talking about here? User backup of all important files, bookmarks, user profiles and their desktops using Microsoft User State Migration Toolkit v4. We want to do this not from within Windows but during the Windows PE state before we apply a new OS.
The good thing about doing this in Windows PE and with Hardlinks is pronounced Speed. Hardlinks make file copying locally and over the network unnecessary. It needs no extra disk space and there won’t be any locked files as when you’re doing migrations from within Windows. It’s not magic but it’s pretty close.
Also if you have a computer that doesn’t boot into Windows but has lots of important files on it and with a readable disk – this is the only way to copy that data.
The only thing you can’t do with USMT and Hardlinks in Windows PE is if you’re replacing the hardware. USMT with hardlinks in Windows PE mode is for re-installing the computer with a new OS (or OS version) only. For other scenarios you need a server-state store. That method is not covered in this post.
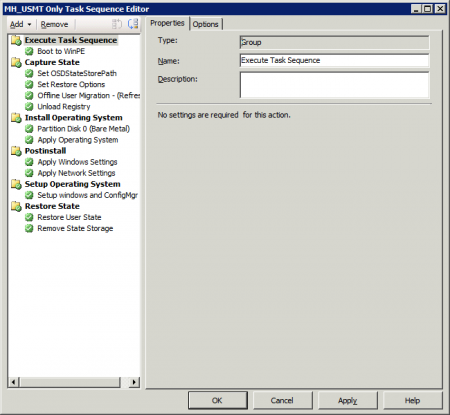
Let’s jump straight to business. Here’s what my Task-sequence looks like, stripped off stuff that’s not important for what we’re trying to illustrate here.

First a short overview of what it does. All the meaty details are further below. You can download the entire Task Sequence here. (Rename it to *.xml and import into SCCM.)
Read More…Read More…